Understanding Kubernetes: Autoscaling
It has been quite a while since my last article - summer and life happened ;) But finally I am back and it’s time to continue our Kubernetes series. In the last article, we looked at requests and limits and how Kubernetes uses them to decide how much CPU and memory a Pod needs. But there is still one question left: What happens when your application suddenly needs more?
You could just run more Pods all the time. That would work of course, but it also means paying for resources you don’t need most of the time. This is where autoscaling comes in, allowing Kubernetes to automatically adjust to changing workloads by adding or removing resources when they’re needed.
Let’s have a look at how this works.
Horizontal vs. vertical scaling
There are two basic ways to scale an application:
Vertical scaling means giving an existing Pod more resources, e.g. by increasing the CPU or memory available to a Pod. Horizontal scaling means running more replicas of the same application.
For many Kubernetes workloads, horizontal scaling is the more natural approach. Rather than trying to make one Pod bigger and bigger, we simply run more copies of it. This also means an application needs to be able to be run with multiple replicas. A stateless web application? Usually no problem. A database? Well… that’s a different story. ;)
The Horizontal Pod Autoscaler
The Horizontal Pod Autoscaler (HPA) does pretty much what its name suggests: It changes the number of replicas of a workload.
Let’s say we have a Deployment running two replicas:
spec:
  replicas: 2
While these two replicas are sufficient for most cases, we would still like Kubernetes to create more Pods for us in case CPU usage starts getting high. A simple HPA definition achieving this could look like this:
apiVersion: autoscaling/v2
kind: HorizontalPodAutoscaler
metadata:
  name: nginx-hpa
spec:
  scaleTargetRef:
    apiVersion: apps/v1
    kind: Deployment
    name: nginx
  minReplicas: 2
  maxReplicas: 5
  metrics:
    - type: Resource
      resource:
        name: cpu
        target:
          type: Utilization
          averageUtilization: 70
With this in place, we tell Kubernetes to scale our Deployment up to 5 replicas in case the average CPU utilization across the Pods goes above 70%. If the load drops again it can scale the Deployment back down.
But how does Kubernetes know about the CPU utilization?
Not surprisingly, the HPA doesn’t magically know how much CPU our application is using; it needs the corresponding metrics. For basic resource metrics such as CPU and memory, the Metrics Server is the place to go.
And there is another important detail here: CPU utilization is calculated relative to the CPU request.
Let’s say our container has:
resources:
  requests:
    cpu: 500m
If the container is currently using 250m, that’s 50% of its requested CPU. And if our HPA target is 70%, we’re still below the target.
This is one of the reasons why requests aren’t just some random numbers we put into a Deployment. They are important for scheduling, resource management and autoscaling.
What actually happens when the HPA scales?
Let’s say our Deployment currently has two replicas, then traffic increases and the Pods start using more CPU. The HPA observes the metrics, calculates that two replicas aren’t enough to reach the configured target and updates the desired replica count. The Deployment then creates another Pod. When the load drops again, the same process starts again - just in the other direction.
This is worth remembering because the HPA isn’t creating Pods itself. It changes the desired number of replicas of the workload it’s watching. The Deployment then makes sure that the desired state is reached.
What if there is no room for the new Pod? Hello, Cluster Autoscaling!
Imagine the HPA decides that we need ten Pods, but our cluster doesn’t have enough CPU or memory to schedule them. So while the HPA has done its job and we have more desired replicas, we will be left with some Pods stuck in Pending state.
This is where cluster autoscaling can come into play. A Cluster Autoscaler can increase or decrease the number of nodes in a cluster based on resource requirements.
So we can end up with two different layers of scaling:
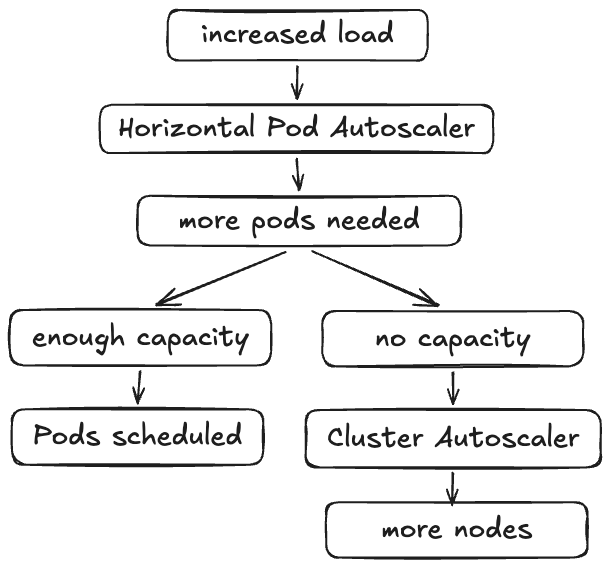
So while HPA scales workloads, the Cluster Autoscaler scales the cluster itself - and they can work together. Depending on where your Kubernetes cluster is running, adding a node may involve provisioning another VM or machine through your infrastructure provider.
So “autoscaling” can actually involve quite a few moving parts.
Why CPU isn’t always a useful metric
CPU is convenient because it’s available in most Kubernetes environments by default. But it isn’t necessarily a good indicator of whether your application needs more replicas.
Let’s say you have a worker processing messages from a queue. The application might be sitting at 20% CPU usage. While this looks fine, there are 50,000 messages waiting to be processed - but CPU doesn’t tell us anything about that. In this case we want to have more workers when there are too many messages waiting.
This is possible by adding tools such as KEDA to the picture.
Event-driven autoscaling with KEDA
KEDA extends Kubernetes autoscaling with support for event-driven metrics.
Instead of only looking at CPU or memory, you can scale based on things such as:
- Kafka messages
- RabbitMQ queues
- AWS SQS
- Azure Queue Storage
- Prometheus metrics
- and many other event sources
So in our previous example, KEDA would monitor the queue and provide the relevant metric to Kubernetes. If the queue gets too large, the HPA can then increase the number of worker Pods. When the queue gets smaller again, the number of Pods can be reduced.
“Why isn’t my HPA scaling?”
This is probably one of the first things you’ll run into when playing around with HPAs. ;) Before assuming something is broken, there are a few simple things I’d check:
Is Metrics Server working?
Try:
kubectl top pods
If Kubernetes doesn’t have current resource metrics, the HPA can’t make a useful scaling decision.
Does the container have a CPU request?
Remember: CPU utilization is calculated relative to the configured CPU request.
Is the workload actually under enough load?
An HPA with a target of 70% won’t scale just because it exists. If your Pods are happily sitting at 20%, Kubernetes has no reason to add more replicas.
Can the new Pods actually be scheduled?
The HPA might already have increased the desired replica count, while some of the new Pods are sitting in Pending because the cluster doesn’t have enough capacity.
Scaling isn’t magic
That’s probably the most important thing to take away from this: Autoscaling doesn’t magically make an application scalable. It gives Kubernetes a way to react to changes in workload.
So before adding an HPA to everything, ask yourself: What actually tells me that this workload needs more capacity?
Sometimes that’s CPU. Sometimes it’s memory. Sometimes it’s the number of requests, or a queue. And sometimes it’s something completely different. 😇
Summing up
Autoscaling gives Kubernetes a way to react to changing workloads, and in this article we looked at different aspects of it. But the important part isn’t so much adding an autoscaler to everything. It’s figuring out what actually tells you that your application needs more capacity.
And with that, we’ve covered another important piece of the Kubernetes puzzle. Next up in this series: Monitoring. Stay tuned. :)
header image created by buddy ChatGPT